Search

Showing posts with label colorful. Show all posts

October 22, 2013

Fall Leaves Garland


I am finally getting around to posting my fall decorations-and this year I actually have a sewing machine to piece together this colorful garland. I love garlands of all types all through the year.  It was so easy to trace leaves from my backyard and cut them out of the felt. I chose four different types of leaves and four bright colors.

I simply stitched a straight line through each leaf and before I got to the end I overlapped the edges  just enough to attach it to the next one. I attached ribbon to each end by sewing the ribbon through the backside of the end leaf. I added a few embellishments on some of the leaves using the decorative stitch setting in zig zag shapes. It took only one afternoon to make this pretty fall garland!


Sharing at some of these link parties!

November 2, 2012

Simple Thanksgiving Felt Garland


So, the holiday season is here again. You might have noticed, I haven't been posting as much as when I started this blog a year ago. I have been on a crafting/project marathon this past year-so many projects completed, so many new ideas and techniques I got to try! It's been a lot of fun sharing my ideas and "meeting" all of you! I have been overwhelmed with your nice comments and thrilled with being featured on bigger sites.

But I have decided to take it slow for the next few months. Anyone who blogs knows how time consuming it and even competitive it can be, especially during this season. But I just want to enjoy time with my family and friends. Yes, I do have a few Christmas ideas up my sleeve and I hope you get a chance to check out last year's ideas. I hope you will still stay with me. In the spirit of recycling I am reposting this Thanksgiving idea from last year: Simple Thanksgiving Felt Garland.

I love Thanksgiving--it is such a simple season of gratitude--I think it's important to remember the ways we are blessed. I always think it's a shame that this holiday often gets overlooked by the rushed Christmas season ahead.

This year, I decided to celebrate a little early and decorate with a simple reminder to "be thankful". I have been loving all the machine sewn together felt garland I've seen around different blogs and on Pinterest.

Since I don't have a sewing machine yet,  I decided to put an old-fashioned spin on designing my own by hand stitching the garland.  I was excited to find some recycled felt made from Eco-Fi-made from 100% post-consumer plastic bottles by the brand Creatology. Plastic bottles never felt so soft...

Here's what you'll need to make this project: 


  1. Yarn needle

  2. Felt in various colors

  3. Fabric scissors

  4. Yarn-I used two types of textures, but used the smooth kind for the lettering

  5. Glue gun or tacky glue

  6. Small circular containers in different sizes to trace-try a spice jar or medicine cup.

  7. Pen or pencil 


  8. First, I traced my circles around the containers-I alternated between two different sizes.


    Then, I cut out each circle until I had enough to spell out my words. I used 11 circles.


    Next, I threaded my yarn needle with the wavy yarn and stitched loosely through the center of the first circle.


    I repeated the process, leaving about an inch between circles, until I ended up with a long chain of circles, like this:


    To make the words, "be thankful" I cut small pieces of straight orange yarn and just looped and connected the pieces to form each letter. I then glued each letter to the center of the circle.


    (keep in mind that I formed the letters first before trying to glue them!)


    Are you ready to see the finished garland?  Here it is!


    Pin It

    a shot from below, the garland is held in place by the gourds:


    I love my colorful reminder to "be thankful"...

    If you liked this idea, I hope you get inspired by checking out the rest of my holiday tutorials! And be blessed this season...

    Thanks for visiting ReMadeSimple!


    Linking up with these parties:

    September 26, 2012

    Trash To Treasure Gallery Wall


    This summer I worked on remodeling my bathroom by adding a fresh coat of paint, a new mirror, lighting and as a finishing touch, a colorful gallery wall. Can you believe everything I used came from thrift store junk? I choose the pieces that had an interesting shape and the potential for prettiness-because I know what paint can do!

    Below is everything I used to create the look above: 
    Stainless steel platters, outdated Avon recipe plates, cast iron owl trivets...stuff you might just throw away, or transform like I did!


    Here's what I did to create my gallery wall: 


    June 29, 2012

    Boys' Bedroom Makeover:The Big Reveal!


    What a busy month! These past few weeks, we have tackled the big project of creating a fun, colorful bedroom for our boys to share. It was past time for our two year old to be done with his crib so to maximize play space on the floor, we bought bunk beds for them from IKEA. (They have a nice low to the ground set perfect for toddlers and preschoolers that they can grow into). 

    These past few weeks we ripped out carpet, painted wood floors, painted walls, assembled bunk beds, put up curtains, painted garage sale furniture and even created a huge chalkboard wall! Then, we passed out...

    I added finishing touches with handmade decorations and transportation stencils.The end result was an eclectic blend of modern and vintage, salvage and store-bought and of course, repurposing and I am thrilled with how it turned out. And so excited to share with all of you!


    Our whole house was painted with this shiny beige paint that reminded me of liquid makeup-not a huge fan. After a year and a half of slowly getting rid if it in different rooms, I decided to change them in the boys room to a soft gray called "Sharkey Gray" using Glidden paint and toned down the semi-gloss sheen by using eggshell. I also painted the white trim a shade lighter than this in a pale gray.

    Then it was time to rip up carpet! I left this job to to the hubby. Why paint wood floors? Well, it was cheaper than refinishing wood floors. And, ours were dinged up and stained from age so it was a good option for us. And, the carpet that came with the house was pretty cheap and ugly.

     So, when I first thought about painting wood floors, it sounded a little intimidating, but after a little research and some easy tutorials, it sounded about as hard as painting a wall. Turned out to be so simple!

    Here's how we did it: 


    First, we patched up all the dents with wood putty. 
    After they were dry, we sanded them smooth primed the floors and allowed to dry, using a brush for the edges and a roller on an extension pole for the rest of the floor. 
    After the primer was dry we added two layers of floor paint. We used indoor/outdoor latex paint in a soft white. 


    Then, it was time to paint the walls. I chose navy blue and bright orange as accents to paint in the ridged rectangle sections we were lucky enough to have in a few of our rooms. (Anyone know the technical name for them?) Gotta love built in character of an older home!

    Wonder how I got those perfect paint lines on my textured walls? Click HERE  to see an easy trick using painter's tape to do just that.


    Pin It

    Here I added some cute airplane and cloud stencils in the entrance using the Martha Stewart craft line, and switched out a basic ceiling fan for new lighting and bunk beds from IKEA.


    My boys love their new room! The only downside is that my two year old has decided playing in his new room is more fun than sleeping...


    A vintage 7-UP box makes a fun place to store their books.


    Chalkboard monograms and huge chalkboard wall

    my sweetie! 


    Pin It

    I told you the chalkboard wall was huge! We painted this section with green chalkboard paint and it really feels like it's time for school. In the corner is a name pennant I made out of old jeans and burlap. I'll share more details in a later post about how I did it.

    my other sweetie! 


    IKEA has the best wooden toys! They are learning how to count with this abacus.


    Pin It

    We created a fun school room look by adding vintage desks found at a consignment shop and an old globe snagged at a garage sale.


    Another name pennant made with jeans, burlap and stencils.


    A garage sale table transformed with paint, stencils and glow-in-the-dark painted tracks! (Don't worry, I'll show you what it looked like before in a later post).


    Having fun coloring on their chalkboard-yes, they love their new room...


    Another fun schoolroom accent was adding an old map to the wall framed in pallet planks.


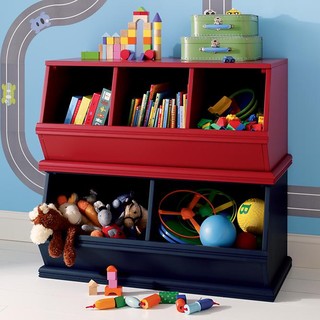
    No, I did not pay the $125 that Land of Nod suggests for this toy bin. Below is their version:


    I already had this one found at a garage sale years ago and painted it navy for a great knock off look for cheap!


    Ok, another cute kid shot. I can't resist! 


    So, there it is! All done on a budget to create a high-end look.  Our labor of love is finally done and I'm really proud of all the hard work it took to transform this space from blah to boy's wonderland.

    Looking forward to sharing a few more detailed posts with before and after pics of my garage sale furniture revamps and how I created the room accents.

    Hope you enjoyed the room tour and thanks for stopping by!

    Linking up with these parties.