Search

Showing posts with label Martha Stewart crafts. Show all posts

November 23, 2012

DIY Winter Snowflake Garland


Pin It
Today, on Black Friday, I didn't join all the crazies in lines at the stores and road rage on the road.  Instead, after a fun and relaxing Thanksgiving with my family, I decided to get to work on some DIY Christmas decorations like these beauties. 

I love browsing through catalogs for ideas I can make the cheaper copycat way. I got inspired to make this lacey garland after seeing Land of Nod's Winter Wondergraph Garland below:


 I was convinced I could make a thrifty version of this garland with materials I already had stashed at home. Land of Nod's description says they were made with "coated paper" so I decided to try using wax paper, using a technique I learned when I made my Faux Capiz Shell Chandelier.

Here's what you'll need to make this garland: 
  • wax paper
  • parchment paper
  • iron
  • circle cutter or scissors and circle to trace
  • white acrylic craft paint
  • string or thread
  • needle
  • round patterned adhesive stencil (I used Martha Stewart's craft line)
  • paint pouncer or craft paint brush
First,  iron three squares of wax paper together sandwiched in between two pieces of parchment paper. 

After paper is cool, use circle cutter to make circles a few inches wide ( or trace and cut out circles) I cut out twenty for my garland. 


Then, press your circle stencils to the center of paper circles and paint with pouncer or brush. 


I used two different sizes to create a lacey snowflake pattern. 


Finally, push thread in and out of top of each circle using a sewing needle until each circle is connected for your finished garland. 


Pin It


You can hang your finished garland in a Christmas tree, across a wall or in a window like I did. I love the delicate look of these in my kitchen window and plan on keeping them up all winter long! 
Thanks for visiting ReMadeSimple! 


p.s. If you loved this idea, please check out the rest of my holiday tutorials here!

Linking up with these parties. 


July 31, 2012

Transportation Stenciled Kid's Table


What would you do with this table if you found it at a garage sale? 
I wondered the same thing when I found it at my neighbor's sale last summer. It must have been their daughter's nightstand because her name plus a crush's name had been scratched into it, complete with little hearts all over. Still, I knew it had potential to be something amazing. But I needed to wait for my mind to be inspired...

 So, it sat untouched all winter until I was remodeling my boys' bedroom  and I finally figured out what I wanted to do with it. 

I love browsing through expensive catalogs like the Land of Nod for ideas I can copycat on my budget. They had a lot of cute transportation-themed ideas I wanted to try for the boys' room. I could easily do this because I already had these fun Martha Stewart craft stencils of cars and street lines and a whole lot of paint colors. 
I was ready for my table revamp! 

Here's what I did:

First, I painted the table with bright orange latex paint.
Then, I applied my street line stencils with a foam brush. (I used glow-in-the-dark craft paint for fun.)
Finally, I added my cars after the street lines were dry, using navy and aqua blue. 
After a finishing spray of acrylic sealer my table was done! 


It fits perfectly wedged in between the bunk beds with a tiny fan propped up on it and adds lots of color to the room. My two year old loves using the track to push his cars and trains on- it turned out to be the perfect play table.
(Come and see what I did to their entire room! click here for the big reveal!)

The nice thing about experimenting on cheap furniture is that you don't have to worry too much about messing things up-you didn't pay a lot to begin with, and paint is so forgiving.

So, if you haven't painted furniture before-what are you waiting for? What potential treasures do you have waiting to be given new life with a fresh coat of paint?


Linking up with these parties.

June 29, 2012

Boys' Bedroom Makeover:The Big Reveal!


What a busy month! These past few weeks, we have tackled the big project of creating a fun, colorful bedroom for our boys to share. It was past time for our two year old to be done with his crib so to maximize play space on the floor, we bought bunk beds for them from IKEA. (They have a nice low to the ground set perfect for toddlers and preschoolers that they can grow into). 

These past few weeks we ripped out carpet, painted wood floors, painted walls, assembled bunk beds, put up curtains, painted garage sale furniture and even created a huge chalkboard wall! Then, we passed out...

I added finishing touches with handmade decorations and transportation stencils.The end result was an eclectic blend of modern and vintage, salvage and store-bought and of course, repurposing and I am thrilled with how it turned out. And so excited to share with all of you!


Our whole house was painted with this shiny beige paint that reminded me of liquid makeup-not a huge fan. After a year and a half of slowly getting rid if it in different rooms, I decided to change them in the boys room to a soft gray called "Sharkey Gray" using Glidden paint and toned down the semi-gloss sheen by using eggshell. I also painted the white trim a shade lighter than this in a pale gray.

Then it was time to rip up carpet! I left this job to to the hubby. Why paint wood floors? Well, it was cheaper than refinishing wood floors. And, ours were dinged up and stained from age so it was a good option for us. And, the carpet that came with the house was pretty cheap and ugly.

 So, when I first thought about painting wood floors, it sounded a little intimidating, but after a little research and some easy tutorials, it sounded about as hard as painting a wall. Turned out to be so simple!

Here's how we did it: 


First, we patched up all the dents with wood putty. 
After they were dry, we sanded them smooth primed the floors and allowed to dry, using a brush for the edges and a roller on an extension pole for the rest of the floor. 
After the primer was dry we added two layers of floor paint. We used indoor/outdoor latex paint in a soft white. 


Then, it was time to paint the walls. I chose navy blue and bright orange as accents to paint in the ridged rectangle sections we were lucky enough to have in a few of our rooms. (Anyone know the technical name for them?) Gotta love built in character of an older home!

Wonder how I got those perfect paint lines on my textured walls? Click HERE  to see an easy trick using painter's tape to do just that.


Pin It

Here I added some cute airplane and cloud stencils in the entrance using the Martha Stewart craft line, and switched out a basic ceiling fan for new lighting and bunk beds from IKEA.


My boys love their new room! The only downside is that my two year old has decided playing in his new room is more fun than sleeping...


A vintage 7-UP box makes a fun place to store their books.


Chalkboard monograms and huge chalkboard wall

my sweetie! 


Pin It

I told you the chalkboard wall was huge! We painted this section with green chalkboard paint and it really feels like it's time for school. In the corner is a name pennant I made out of old jeans and burlap. I'll share more details in a later post about how I did it.

my other sweetie! 


IKEA has the best wooden toys! They are learning how to count with this abacus.


Pin It

We created a fun school room look by adding vintage desks found at a consignment shop and an old globe snagged at a garage sale.


Another name pennant made with jeans, burlap and stencils.


A garage sale table transformed with paint, stencils and glow-in-the-dark painted tracks! (Don't worry, I'll show you what it looked like before in a later post).


Having fun coloring on their chalkboard-yes, they love their new room...


Another fun schoolroom accent was adding an old map to the wall framed in pallet planks.


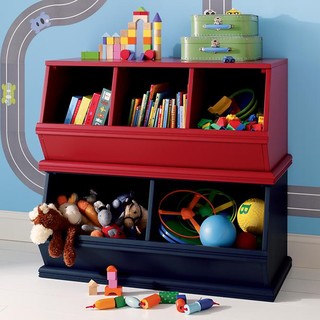
No, I did not pay the $125 that Land of Nod suggests for this toy bin. Below is their version:


I already had this one found at a garage sale years ago and painted it navy for a great knock off look for cheap!


Ok, another cute kid shot. I can't resist! 


So, there it is! All done on a budget to create a high-end look.  Our labor of love is finally done and I'm really proud of all the hard work it took to transform this space from blah to boy's wonderland.

Looking forward to sharing a few more detailed posts with before and after pics of my garage sale furniture revamps and how I created the room accents.

Hope you enjoyed the room tour and thanks for stopping by!

Linking up with these parties.


May 25, 2012

DIY Stenciled Toenails


Pin It


Here's a quick, fun project just in time for sandal season and showing off pretty painted toes. Last month, I had fun with a campaign where I got to play around with a huge box of Martha Stewart's new line of craft supplies to create a Mother's Day gift.

One of the stencils Plaid sent me were these cool reusable adhesive ones with tiny little flowers and patterns on them. What could I use them on? Candleholders, glasses, jars, for sure. What about my toenails? (Not sure what Martha would think...)

 I reminisced back to my junior high days of painting bright polka dots and stripes on my nails and I decided I wasn't too old for fun, colorful nails. So, I bought favorite colors together-yellow and gray and try this little experiment.

And guess what? It worked out great and was so easy to do-not to mention so much cheaper than nail stickers or airbrushed ones. And, it's pretty handy that the stencils can be reused over and over again.

Here's how I did it:

First, I painted my base color-I chose a concrete gray.


I allowed to dry completely.


Then, I pressed the adhesive stencil onto my toenail where I wanted the pattern to be.


I wiped off the extra polish, then dabbed my second color, pale yellow onto the top of the stencil completely filling in all the holes.


Finally, I carefully pulled off my stencil to reveal the pattern.


(I didn't even have to wipe off the stencil each time or wait for anything to dry before removing the stencil.)


Pin It


So, there you have your easy, cute, colorful DIY stenciled nails. Thanks, Martha Stewart crafts for making it happen!


Linking up with these parties.