Search

Showing posts with label pallet. Show all posts

May 10, 2013

Nursery Reveal


I am so excited to finally reveal my baby's nursery today! As soon as we knew this baby was going to be a permanent part of our family, I got busy working on the room remodel and some crafty accents to go with it.  I had been creating a Pinterest board of all my ideas and color schemes in the months leading up to the adoption.

I wanted to rip out the cheap tan carpet and paint the floors white. I wanted to paint the boring tan walls a paler color with bright accent colors. I also wanted an eclectic look with a gallery wall full of whimsical and vintage art.

Here are a few shots of what the room looked like before: 


I am a fan of nice hardwood floors, but these floors were in bad shape after 90 years!  The cheaper way to go was to paint the floors. My husband helped with that part and already had some practice from painting the floors for our older Boys' Bedroom Makeover  the summer before.


After painting the walls Whetstone Gray by Martha Stewart, I wanted to add some bright stripes to the entry wall. I used Frog Tape and this technique, since my walls are textured, for perfectly straight lines. 


I love how the bright orange and green stripes add pops of color to the room-I chose stripes because I think it's a look that will blend into big boy decor when he's older.


I painted the doors and table in the room the same green as the stripes-Lily Pad, also by Martha Stewart. I painted chalkboard paint on the crib panel so I can write fun messages on it for him-and in his toddler years I'm sure he'll have fun scribbling with chalk.  The tree art is was made for me by a local artist friend, Dani Herrera, who makes amazing things with reclaimed denim, zippers and more.


Pin It


I've had this table for a while and this is now the third color it's been. After painting it, I distressed it with a sanding sponge to reveal hints of white and added new knobs for a brand new look. The thrift store magazine rack is where books are held, next to the comfy chair for bedtime stories.


I made this artwork with a printout given to me by a friend. I traced the elephant onto dictionary paper, cut it out and Mod Podged the whole thing to pallet planks. The curtains and fabric shades are both from IKEA. We have been replacing all of the wooden blinds in the house with ones without cords for safety.


I made this mobile by stenciling airplanes and clouds onto cardstock, cutting out, hole punching and attaching twine. I used an embroidery hoop for the top of the mobile.

Pin It


I moved this IKEA shelving into the baby's room for clothing and the boys' got a bigger dresser to share. The accordian style wall hook fixture was a thrift store find. It also makes a fun display for finger puppets.


Here's the gallery wall-a combination of baby and family photos and some crafty things I made. I loved the idea of hot air balloons combined with Dr. Seuss' "Oh, The Places You'll Go" phrase, so I made this artwork by painting and stenciling a canvas, then cutting out a 3-D hot air balloon out of card stock and gluing to the canvas. I  repurposed an IKEA night light  by cutting out cloud shapes onto navy blue paper and attaching to the light fixture. I Mod Podged an old frame with sheet music, adding a photo of baby's newborn toes.


 It was so much fun redoing this room and I think baby boy loves it too. He squeals with delight when he gets to play there. It was created on a budget and most accessories were either handmade, thrift store finds or things I already had in the house that I repurposed and used for his room. There's so much for him to look at and play with and it was a really great way to celebrate him becoming "finally forever". We love having him be a part of our family!

Thanks for visiting ReMadeSimple!


 I link up at these and this parties.

June 29, 2012

Boys' Bedroom Makeover:The Big Reveal!


What a busy month! These past few weeks, we have tackled the big project of creating a fun, colorful bedroom for our boys to share. It was past time for our two year old to be done with his crib so to maximize play space on the floor, we bought bunk beds for them from IKEA. (They have a nice low to the ground set perfect for toddlers and preschoolers that they can grow into). 

These past few weeks we ripped out carpet, painted wood floors, painted walls, assembled bunk beds, put up curtains, painted garage sale furniture and even created a huge chalkboard wall! Then, we passed out...

I added finishing touches with handmade decorations and transportation stencils.The end result was an eclectic blend of modern and vintage, salvage and store-bought and of course, repurposing and I am thrilled with how it turned out. And so excited to share with all of you!


Our whole house was painted with this shiny beige paint that reminded me of liquid makeup-not a huge fan. After a year and a half of slowly getting rid if it in different rooms, I decided to change them in the boys room to a soft gray called "Sharkey Gray" using Glidden paint and toned down the semi-gloss sheen by using eggshell. I also painted the white trim a shade lighter than this in a pale gray.

Then it was time to rip up carpet! I left this job to to the hubby. Why paint wood floors? Well, it was cheaper than refinishing wood floors. And, ours were dinged up and stained from age so it was a good option for us. And, the carpet that came with the house was pretty cheap and ugly.

 So, when I first thought about painting wood floors, it sounded a little intimidating, but after a little research and some easy tutorials, it sounded about as hard as painting a wall. Turned out to be so simple!

Here's how we did it: 


First, we patched up all the dents with wood putty. 
After they were dry, we sanded them smooth primed the floors and allowed to dry, using a brush for the edges and a roller on an extension pole for the rest of the floor. 
After the primer was dry we added two layers of floor paint. We used indoor/outdoor latex paint in a soft white. 


Then, it was time to paint the walls. I chose navy blue and bright orange as accents to paint in the ridged rectangle sections we were lucky enough to have in a few of our rooms. (Anyone know the technical name for them?) Gotta love built in character of an older home!

Wonder how I got those perfect paint lines on my textured walls? Click HERE  to see an easy trick using painter's tape to do just that.


Pin It

Here I added some cute airplane and cloud stencils in the entrance using the Martha Stewart craft line, and switched out a basic ceiling fan for new lighting and bunk beds from IKEA.


My boys love their new room! The only downside is that my two year old has decided playing in his new room is more fun than sleeping...


A vintage 7-UP box makes a fun place to store their books.


Chalkboard monograms and huge chalkboard wall

my sweetie! 


Pin It

I told you the chalkboard wall was huge! We painted this section with green chalkboard paint and it really feels like it's time for school. In the corner is a name pennant I made out of old jeans and burlap. I'll share more details in a later post about how I did it.

my other sweetie! 


IKEA has the best wooden toys! They are learning how to count with this abacus.


Pin It

We created a fun school room look by adding vintage desks found at a consignment shop and an old globe snagged at a garage sale.


Another name pennant made with jeans, burlap and stencils.


A garage sale table transformed with paint, stencils and glow-in-the-dark painted tracks! (Don't worry, I'll show you what it looked like before in a later post).


Having fun coloring on their chalkboard-yes, they love their new room...


Another fun schoolroom accent was adding an old map to the wall framed in pallet planks.


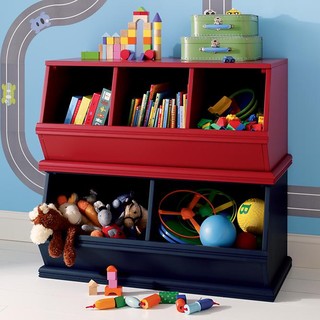
No, I did not pay the $125 that Land of Nod suggests for this toy bin. Below is their version:


I already had this one found at a garage sale years ago and painted it navy for a great knock off look for cheap!


Ok, another cute kid shot. I can't resist! 


So, there it is! All done on a budget to create a high-end look.  Our labor of love is finally done and I'm really proud of all the hard work it took to transform this space from blah to boy's wonderland.

Looking forward to sharing a few more detailed posts with before and after pics of my garage sale furniture revamps and how I created the room accents.

Hope you enjoyed the room tour and thanks for stopping by!

Linking up with these parties.


April 27, 2012

Martha Stewart Mother's Day Campaign: Stenciled Garden Sign


A couple of months ago I signed up to be a part of an exciting Blueprint Social campaign sponsored by Plaid to test out a new line of Martha Stewart's Craft Supplies. You can guess that I had a lot of fun getting this huge box of freebies and dreaming up a project to make for a Mother's Day gift. (Check out what I got to choose from here.)


When I found out that  Martha's new craft paints were good for use indoors or out on wood, glass, metal, fabric and just about any surface I figured the sky was the limit with what I could create.

So, my task was to create a pretty Mother's Day gift using any of the supplies in my goody box. Knowing how much my mom enjoys being outside made me think she might like a decorative garden sign.

 So, in the spirit of repurposing I grabbed a pallet plank from my stash, picked out some of the adhesive and monogram stencils, paint and brushes to design a bright sign to hang outdoors.

Here's what I used for my pallet garden sign:

pallet plank
rope
staple gun
Martha Stewart Monogram stencils
Martha Stewart Craft Paints
Martha Stewart Adhesive Stencils
stencil brushes
paint brushes
stencil tape
pencil
electric sander and sandpaper


First, I secured a piece of rope to the back of each end of the wood with a staple gun so it could be hung from a branch or nail. 

Then I spread out my monogram stencils to spell out the word "GARDEN" across the pallet. 

I drew a line down each edge of the stencil so I could paint the background in sections before stenciling the words.


Next, I painted in the penciled in sections with two alternating colors of brown and fuschia.


I decided to sand down my dried painted wood before adding the stencils to give the sign that nice distressed, weathered look I love.  

Then, I used the adhesive stencil, stencil brush and paint to add a design between the sections where my letters would go with a light aqua. 


I also taped off squares in each section using the stencil tape and painted them in a medium aqua in for even more color borders before adding the letters. 


It was finally time to spell out my word!  I used my monogram stencil and smaller stencil brush to add each letter in brown.  Once these were dry I outlined each one with my light aqua to add contrast. 


I decided my sign was done after adding a few flowery stencils around each letter in light aqua. 


And the humble pallet was transformed! The project had taken a few more steps than I had envisioned in the first place but it was worth it because I was really happy with the nice pops of color in the end result.

Here are a few beauty shots of the garden sign hanging in my yard:


Pin It


I have to tell you, I was really impressed with the quality of the Martha paints. I loved the pretty, modern colors and how smooth they were to apply. And I admit stenciling was a craft I used to shy away from because I thought it would be too easy to mess up, but the adhesive ones were so easy to work with and could be used again. Also using stencil tape to hold down the letters helped too. 

Now, I love stenciling and plan on using these again-maybe on fabric next time?

If you like what you see here and want to be inspired by more Plaid craft ideas and find out about their latest products, ideas and promotion, you can find them on Facebook, Twitter or Pinterest.


I wrote this post as a part of a paid campaign with Plaid and Blueprint Social. The opinions in this post are 100% my own.

Thanks for visiting ReMadeSimple-hope you enjoyed your time here and left with a little inspiration!


Linking up with these parties.